October 28, 2013

I have been meaning to update my experience with making panoramas and was inspired when I ran across one of Robin Wong's blog posts talking about how one should overcome gear limitations. I think that in the right hands, one can make best of the gear that he/she owns, although admittedly, I do have a bad case of gear acquisition syndrome (G.A.S.). Nevertheless, I brought 3 lenses offshore with me and at this point I kind of have to "work with what I got"... a body cap lens, a 50mm f/1.8 M. Zuiko legacy (nifty fifty), and my "kit" zoom. One of my favorite new techniques is using my $50 body cap to shoot panoramas. I posted about the methodology I use here which I inherited through a suggestion from one of my Flickr contacts who does some pretty amazing panorama work. The idea is to turn your camera longways (portrait style) and pan the scene at 3-4 frames per second (LOW mode on the EM5). Then you use software to stitch all the images together. Pretty simple, you just have to make sure to up the shutter speed to avoid blur. I think the 15mm body cap lens is great for this application because:

A) it provides a VERY cheap alternative to VERY expensive ultra wide angle lenses,
B) has a fixed aperture that allows a very wide DOF (necessary for landscapes),
C) features a fixed focus so there is no lens hunting or out of focus shots,
D) and is light and very compact so when your hiking up that mountain you can have enough room to pack your bear spray.. lol

Some people gripe about the image quality of the BCL, but really, when your presenting a panorama (especially on the web) noone is pixel peeping... its about the image as a whole. 
Here are some examples of the finished product. Again, they were all taken lengthwise at 15mm f/8. I have dedicated a Flickr set to all my BCL panoramas and in case you are interested in EXIF data it can be found here. Thanks for dropping by! Any feedback here, at G+, or on Flickr is greatly appreciated.

-Sam D.  


October 22, 2013

I have some pressing matters to attend to this A.M. so this is going to be a no text or EXIF details post. But I have taken a series of photographs featuring a glimpse into the life of offshore workers and wanted to share. Most are on my Flickr and all except the first were shot with an Olympus OM-D EM5 and 40-150mm kit zoom. See here and here for details and my opinion on the performance of this combination. Thanks for checking out my blog, hope you enjoy all the series!! 

-Sam D.
"Safety first"

"Do not use to lift people"

"Escaping heat"

"Down the hatch"

"Powerwash"

"Surrounded"

"Watch out below!"

"Pull"
"Thinking of home"

October 08, 2013

Yesterday I was reading about this absolutely amazing photograph of lighting taken at the Grand Canyon and thought to myself how awesome and challenging it would be to try and capture this subject. It is funny how things work... problems on the ship I am on lead to my night shift being cut short and when I left, there was a show waiting for me outside.

Love and lightning, 15mm, f/8, 0.4 sec, iso 1250
There are several problems with this photo and it does not even come close to the awesomeness of the Grand Canyon shot, but being inspired by Rolf Maeder I thought I would share my post processing workflow for this image. When I took this photo I was using "live bulb" mode on my EM5 and out of sheer luck had pushed (and held down) the shutter button right as this bolt struck. Since lightening is VERY bright, keeping my shutter open for so long (a little under half a second) greatly overexposed my image.

RAW
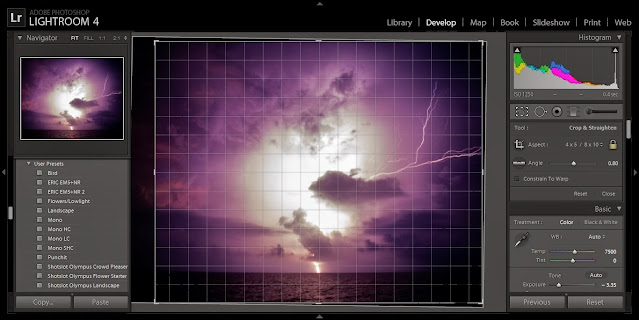
I did not think that I was going to be able to use this image at all, but I figured I would give post processing a shot. Luckily you take in a lot of image "data" if you shoot RAW and I was able to recover a surpirsing amount of detail using Lightroom 4 (LR4). My first two steps were to use the "auto tone" and "auto white balance" functions. For auto tone, LR4 uses the information about the lightness or darkness of the the photo and tries to "normalize" it's exposure. If you look at the top right corner of these screen grabs you notice a "Histogram" module. Putting it very simply, it shows the distribution of lightness v.s darkness (or tonal range) in your photograph. In the raw screengrab above you can see that the distribution of the histogram is skewed to the right.. this means that a majority of the pixels in the image were "light" in nature. Auto tone works to correct this and the results are reflected in the image and histogram below. [On a side note... exposure is something that should be accounted for while taking an image to maximize the detail in your photo and the "auto tone" function should not be relied on. I did not anticipate the bolt was going to be so bright and should have had an increased shutter speed. While using auto tone was not optimal, it was my the best best solution to try and recover this photo.] Auto white balance adjusted the warmth of the image so it was less blue (cold) and more purple/pink. 

Corrected tone and white balance
Next, I adjusted the contrast, highlights, shadows, whites, blacks, clarity, and vibrance sliders to increase the dynamic range of this photo. This is a touchy subject among photographers, and one side of the playing field believes a photo should endure minimal post processing to keep the photo in its most "natural" state. But I think that a photo should grab the viewers attention and I am usually one to try to increase the "pop" of a photo. 

Increased dynamic range.. or "made it pop"
The combination of the lens I used (15mm Olympus body cap lens) and bright light caused pretty significant vignetting which was slightly increased on the left hand side of this photo. To alleviate the unevenness, I used LR4's crop function (8x10) to even this out. I did not bother trying to remove the vignette because I liked the overall effect it gave. I also tried to line up the horizon so that overall, the waterline was symmetrical on either side of the photo.

Cropped
From the picture above, you can see that the water line is bowed in or not straight along the gridlines provided by LR4. This is because of optical distortion which is common with wide lenses. In order to alleviate this I used LR4's lens correction module to level out the waterline.

Corrected optical distortion
Because I corrected the optical distortion, I needed to go back and re-crop the photo so that none of the edges were bowed in. I couldn't tell the water line was uneven until I cropped it the first time, or I would have corrected for distortion first.

Second crop
Next, I used the noise reduction and sharpening tools to try to maximize the details. I think the Olympus body cap lens is great, BUT it renders the worst image quality out of practically anything you can put in front of the EM5. There is not much you can do about this and I love this lens for other reasons besides its image quality. I need to invest in a more robust "wide angle" lens for my EM5, but for now the body cap lens is doing a fine job of capturing some great images for me. 

Sharpened with noise reduction applied
So now my image is at a state where I have altered it a bunch so I go back through and re-evaluate/alter my dynamic range sliders (contrast, shadows, clarity, vibrance etc..) until I am happy with the image... Normally I would stop here in my editing process, BUT, I want something more. Now here is where things really get into that slippery "is this natural" area, but its my interpretation of reality I wanted this image to be BOLD. In order to accomplish this I used the adjustment brush to darken or "burn" the clouds in front of the lightning bolt in addition to the water that is being illuminated by it.

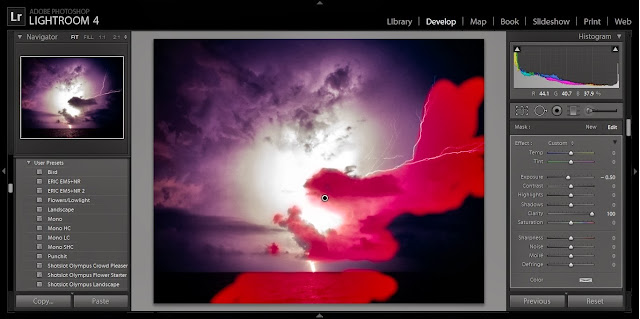
Burned to accentuate foreground
Now the image foreground is where I want it to be so I go back and make my final adjustments to the "dynamic range" sliders until I am completely satisfied with it's coloration and "pop". 

Final dynamic range adjustments
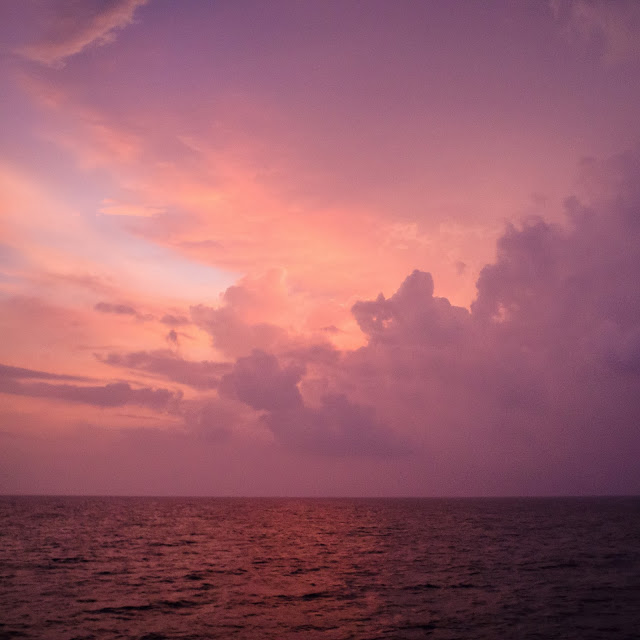
Finally, I used Huelight's color fidelity high contrast camera profile to give it even more of a boost in color. I love their profile for the EM5 and it can be purchased for a mere $10 if you click the link above. It comes in "standard", "low-contrast" and "high contrast" profiles. I usually apply this profile first as it alters my raw images in a way that mimics the out of camera jpeg provided by the EM5. This time around I forgot to apply it till the end but I think it gave the photo that final firm kick in the behind and made it shine.

Huelight "high contrast" camera profile applied
Well, I hope this gave you insight into my post processing technique good or bad as it may be. I taught myself how to use LR4 through trial and error and I am sure there is plenty that I have yet to learn. Your opinions are always welcome here or on my Flickr page and I am wide open for suggestions. Thanks for stopping by and reading my blog!!

-Sam D

MORE PHOTOS!!!

Shish kabob, 15mm, f/8, 1/60, iso 6400 
"Actually, lightning comes from the bottom up", 15mm, f/8, 1/60, iso 2500

Split second, 15mm, f/8, 1/60, iso 3200
After the Aftermath, 15mm, f/8, 1/60, iso 2500


October 06, 2013

Yesterday I took some more panorama shots that I was happy with and its getting easier each time! I think the best method is to shoot using burst (or sequential) mode at 3-5 frames per second while sweeping across the landscape or subject you want to capture. You end up with 9 to upwards of 15 shots per scene depending on how much coverage you want but Photoshop's photomerge works best if you have a lot of overlap between frames. On an EM5 (and possibly other cameras) you can enable an electronic level which helps keep everything lined up. Something to watch out for is that you have to be careful that you don't cut anything out of your frame. For the photo below, I wanted to make sure that all the electronics at the top of the vessel were in my picture so I positioned my camera (portrait style) in the center first and then moved over to the left and started taking the photos in a sweeping motion to the right. This helped me scale where I needed my camera to end up in the middle of the frame so that the whole boat was covered.  

Facing the beast, 15mm, f/8, 1/250, iso 200
 Here is the sequence of shots that were originally taken:

Breakdown of "Facing the beast"
As you can see I ended up with 16 pictures which is a lot, but I guess I was just being paranoid and ended up gong pretty slow. I suppose if you went faster you could cut it down to 10 or 12 shots. I am so grateful for my Flickr contact Lars who suggested that I try the "sweeping while in burst pulse mode" method for shooting panoramic scenes. If you have yet to compose a panorama and want to try it out (even if you only have a point and shoot) I suggest this method. They are a lot of fun and I cannot wait to try this technique out on some of the great scenery there is back home in Miami. Thanks for stopping by!

-Sam D

MORE PHOTOS!
Thunderstorm, 15mm, f/8,  1/640, iso 200 
Don Nikola, 40mm, f/8, 1/640, iso200

October 05, 2013

My first attempt at composing a panorama was a bit of a bust. Through a suggestion from one of my Flickr contacts I saw that using your camera's burst mode while sweeping across a subject or landscape was an easier way of taking handheld panoramas. I tried this method and it worked out pretty well. Using my 15mm body cap lens, I stood dead center behind the Viking I's bridge and swept across in a left to right fluid movement while holding down my shutter button at 3fps. I used the 15mm BCL so that I wouldn't have to worry about mess ups in auto focus and because it is my widest lens at the moment and I was only about 3-4 meters away from the staircase shown in this photo. The result was about 9 photos (portrait frames) which I then stitched together using Photoshop's "photomerge" function. I like the fish-eye effect this ended up with and the overcast sky turned out nice once I converted to back and white. 

Command center, 15mm, f/8, 1/640, iso 2000
What I do not like is that the top of the ship where all the electronics are is cut off. Because of the layout of the ship this is as far back as I could get without my view being obstructed. I wish I had a lens that was a bit wider, but even a 12mm is only mildly wide (24mm) on a micro four-thirds camera and I dont think that would have made much of a difference. Today I am going to do this at the front of the ship where I will have more space to step back. Hopefully I will be able to get all those cut off interesting bits in the frame. Although  I still have to work on the burst pulse method for taking panoramas it was infinitely better than the ---shoot, move your camera, recompose, shoot--- method and the outcome of this photo makes me want to keep trying it. Thanks for reading!

-Sam D.

October 04, 2013

While looking for a photo for this blog I ran across the first long exposure shots I took on random instances while at Disney World. According to my Lightroom catalog, I came home with 1,586 shots from that week and still have yet to process the bulk of this. However, when I came across these I remembered how much fun it was taking them and decided to share. I guess these may not be considered professional or technically sophisticated in any photographic capacity, but thats not the point. Turning light sources into something artistic and abstract out of sheer luck is something that you cannot do by taking control. Not knowing how a long exposure shot is going to render after (finally) releasing that shutter button can seem like a backwards and terrifying process for photographers who are obsessed with precision... but who doesn't love a surprise now and then?!

Flotsam and Jetsam, 15mm, f/8, 3.2sec, iso 200 
Next time you are bored (preferably at night), turn your camera to bulb mode, go out and find something bright/shiny and photograph it for a random period of time... Wave your camera around. Rotate it. Jump. Run. Jump while running. Run while rotating, waving, and jumping (j/k dont do that last one you might get hurt). The point is to not really have an idea of how things are going to turn out until you are out there. Sometimes the results are bad and do not have any sort of positive composition. But... usually with a little experimentation or sometimes by blind luck you can come up with some pretty unique photos. I recommend doing this especially if you have never used the bulb feature on your DSLR or micro four-thirds digital camera. Even if you do not enjoy this type of photography it will expose you (pun intended) to this great setting that you can then utilize for something else. 

Chasing dreams, 50mm, f/1.8, 1.5sec, iso 200
When I was first reading about the EM5 I did not have any idea what the "live bulb" or "live time" modes were.. I figured they were features that I wouldn't use because I did not fully understand what they did. It was only after I read articles on astro-photography that I understood their usefulness. Going from a minimal photographic background to the EM5 was a bit of an undertaking at first. I had done a lot of research on photographic principals, but putting it into action required something more. Nevertheless, I did not experiment with bulb mode for a while after getting my first "grown up" digital camera because I was busy learning how to apply other basic photographic principals. 

Vortex, 15mm, f/8, 2.1 sec, iso 200
One day sometime before my partner and I's trip to Disney, I told myself "Self, you are gong to learn how to use bulb mode" and pulled up the EM5's user manual. As confusing and useless as that thing sometimes is, I did learn that I had to be in manual mode in order to access it (I am pretty sure now, all cameras are like this). Once if figured how to engage it I played with it for some time that day with no real results besides blurry pictures and kinda forgot about it. It wasn't until while on the road to from Miami to Orlando, I took my first long exposure shot at night. I am going to spare you with the streaky car lights photo because that has been done and done again (see one of my "overdone" examples here), but I was instantly hooked.

Pentagon, 50mm, f/1.8, 3.3 sec, iso200
Some readers may think all of this is a bunch of crap because I had only minimal control over the composition... but thats fine, photography is subjective and everyone is entitled to their opinion. Personally, I think being creative and having fun is the most important thing. If you do enjoy this type of abstract work and are interested in creating your own I would suggest you visit an amusement park. They have ALL SORTS OF LIGHTS!!! Everywhere you turn there is something neon and flashing at you. Moving cars are also another great way to get this effect. Disney was the perfect environment to experiment and some shots were taken LITERALLY running from one ride to the next.

Don't go chasing waterfalls, 15mm f/8, iso 200
For a less abstract take on this subject matter see EXOGRAM's flickr. He has created some very elegant nighttime shots that I am a big fan of. Finally, thanks for checking out my blog and reading all of this!!

-Sam D.

MORE PHOTOS!


Dumbo, 50mm, f/1.8, 3.3 sec, iso 200
Space Mountain, 15mm, f/8, 1/10*, iso 200 
Bass fiend, 15mm, f/8, 1.8 sec, iso200 
Confetti, 15mm, f/8, 5sec, iso200 
* for "Space Mountain" the shutter speed I don't think qualifies as a long exposure, but is below the recommended 1/effective focal length which in this case would have been 1/30 shutter speed.  

October 03, 2013

I have been wanting to try to compose a panorama because a Flickr contact of mine (Lars Haugland) produces some stunning work by image stitching. This morning when I got off shift from work, I had the perfect opportunity because there was a beautiful sunset out. Its my first time trying this so needless to say the processing was a PAIN IN THE PROVERBIAL!!!  ...so here's the sunset, in all its (un)glory:

Frankenstein, 40mm, f/8, 1/500, iso 200
It was compiled using seven portrait style images taken with my EM5 and 40-150mm "cheap" telephoto. Maybe its because I am on a moving vessel and do not have a tripod with me (not that it would help).. but as you can see, Photoshop's photomerge function had a bit of a hard time lining up the horizon after what I assume to be, lining up the clouds. The seas were pretty calm so I would hate to see how this image would have turned out (ie not turned out) during rough weather. I also took a photo of the same sunset using the 15mm Olympus body cap lens, but I dont know which one I like better. When it comes to image quality, the panorama takes the cake because the file is humong-o, but I like the composition of the one shot better. I think more sky and water above and below balance out the busyness of the clouds. The latter sure was a heck of a lot easier to take. Maybe my focal length for the panorama was too long. I am going to keep playing with this!!

It's Alive!, 15mm f/8 (and be there), 1/500, iso 200 
In other news I purchased my first 35mm film camera tonight and am SUPER EXCITED!!! It is an OM10 with the manual shutter speed adapter (score!) and 50mm 1.8 M. Zuiko lens. I have the same (great) lens for my EM5 so if anyone is in the market, I will be selling one pretty soon. It is also coming with a flash unit, and a Toyo Five Star 70-200mm f/4.5 Macro Zoom, leather case and a whole bunch of other misc stuff. I. AM. STOKED. I have a feeling the Toyo is a doorstop, BUT I am excited to use the OM10 with my Soligor 17mm f/3.5. On my EM5 this lens has shown some really great results, and paired with an actual 35mm camera I will have a proper wide angle lens for landscape and architecture. YAY, now I just have to practice developing film. I think I got a good deal on everything considering I paid $68 USD and I have seen the M. Zuiko 50 alone on ebay for around $40 USD (and I think I paid more than 40). I suppose it all depends on the condition everything is in... to bad I am stuck on a boat! There is something magical about being on the ocean, but I miss home, my partner, and especially my cat!! Oh well, it could be worse... I could be stuck out here without my camera.

Roar, 17mm, f/3.5, 1/100, iso 800


October 01, 2013


I need to begin this post by saying that I am not an avid bird watcher and am very far from an ornithologist. However, I do admire birds and really enjoy the challenge of trying to identify them in nature. For this I use David Allen Sibley’s guide, but there are many others which have been recommended to me. I guess I am a light birder and people who have been bird watching their entire lives likely would give you far better advice than me on techniques to stay unnoticed while observing birds in their natural habitat. In addition, I suggest checking out Ming Thein’s tips for telephoto photography which has some great advice regarding the use of long lenses. I am just writing this in order to share some of my experiences while using my EM5 and 40-150mm zoom to capture photos of birds while working on the Viking I. I think this vessel makes a great habitat for birds because the machinery on the back deck offers plenty of hiding spots and vantage points. I guess we are somewhat of a concrete jungle floating in a sea of blue.

Peregrine Falcon (), 150mm, f/5.6, 1/100, iso 200
When I first ventured out to try and capture photos of birds in this environment I was not aware of this lens' sweet spot (see part 1 for links to reviews). My initial photos would likely have been sharper if I had controlled my shutter speed, aperture, and iso settings in a better manner, but C'est la vie. The first morning that I ventured out I was immediately greeted by a red-eyed vireo while walking up the stairs.. he actually scared me instead of the other way around! Luckily he stuck around for a bit and I was able to take several photographs of him. After processing this first series I was amazed at the detail that my "cheap" zoom offered. I found that it was absolutely enough to identify the bird down to species level, even to the point where I could count the whiskers coming off its face =) 

Red-eyed vireo (Vireo olivaceus), 150mm, f/5.6, 1/100, iso 200
Although its is not the BEST photograph in regards to sharpness, it makes a good example for my first tip.

1.     Shoot RAW or RAW+JPEG

There are a lot of articles online that expain the benefits of shooting RAW vs. JPEG, and put simply, RAW files are the digital version of film which can be “developed” using photo editing software. When shooting RAW, images you take are not compressed and you are able to retain all of the data your sensor records. This is less important when say, you are shooting a "landscape" or "street" because they are not reviewed in on a micro scale. Birds on the other hand are intricate and detailed so you want to preserve as much information as possible when capturing a photo of one. One drawback to shooting RAW is that the images are much much bigger in size so investing in a portable external hard drive to keep all this awesome data is necessary. On a side not (and likely a future blog topic) I do all my editing in Lightroom 4, but Photoshop, Olympus viewer 2 (which if you have an EM5 came with your camera) and a host of other software are also available. If you use LR4, there is a great set of presets developed by Slotshot for the OM-D. I typically use these in conjunction with the Huelight Color Fidelity LR4 camera profile and then tweak as necessary. The images below are 100% crops of my red-eyed friend showing the differences between the RAW file, out of camera JPEG, and edited RAW file.

Unedited RAW, 100% crop

Out of Camera JPEG, 100% crop
Edited RAW, 100% crop
As you can see, there is some improvement in the quality and color rendering between the out of camera JPEG and edited RAW version of this photo. Again, stopping down to f/8 and increasing my shutter speed to at least 1/200 to 1/300 would have in my opinion helped with the sharpness of this photo. Another technical problem with this shot is that the subject was not in the dead center of the frame as you can see in the original below:

Original edited version of "Red-eyed vireo"
Lenses are usually best at their centers so it is best to keep your subject centered if you want to maximize your image's sharpness. I have learned a trick that "forces" me to better compose my images towards the center, which brings me to my next tip.

2. Turn your Digital Tele-Converter ON 

Turning on your digital tele-converter will crop your photo by a factor of 2 which can be beneficial for bird photography for two reasons: A) it forces you to frame the subject more towards the middle and B) it allows you to change settings while in a pseudo magnification mode. The EM5 has a magnification feature which blows up the image (from 5x to14x) so that when focusing manually you can "fine tune". This is great, BUT, when you are in this mode you cannot easily adjust your aperture, shutter speed, iso, or any other setting. Enabling your digital tele-converter results in a 2x "magnification mode" where you can quickly change settings without toggling back and fourth. If you have ever tried to photograph birds you know that most do not like to be photographed... Even if they do not know you are there some species are just quick and "flighty" in general --think hummingbird-- so it is important to be able to change settings quickly so that you can actually take your photograph before its too late. The nice thing about the digital tele-converter is that if you are shooting RAW+JPEG, the JPEG will be saved as a tele-converted file but the RAW version will be full size. If you took the picture with framing in mind, you can then use your JPEG as a map to crop the RAW file. HOWEVER.. a word of caution here!! If the bird is close to you (within feet) then turn your digital tele-converter OFF. In the photo below, I missed what I think would have been a good shot because I framed the birds head in the middle with the tele-converter ON and the birds tail did not fit in the frame. Meanwhile, theres LOADS of extra space to the left of the frame. 

Shake your tail feathers, 150mm, f/8, 1/640, iso 500
Well, you learn from mistakes and there is light at the end of every tunnel. The digital tele-converter has an additional inherent usefulness in that you can ensure that your shot is in focus before you hit the shutter button. The photo below was taken at the optimal aperture for this lens at it's long end (f/8) and with a fast shutter speed as to freeze movement. Also the subject's face was in dead center of the frame. Under all these "ideal" conditions (which require good light), I'd say the lens is a fairly good performer at it's long end and when your subject is fairly close you are able to capture fine details. Another thing to note is that even stopped down to f/8 the background exhibits a nice creamy bokeh and details are washed out as to not distract from the bird. 

Bobolink (Dolichonyx oryzivorus), 135mm, f/8, 1/640, iso1600
Unedited RAW, 100% crop
Migratory birds have a long difficult journey from North America to South America each winter. Most get there thoroughly exhausted, some half dead, and others just don't survive once they make it... I have come across a slew of dead warblers and vireos on this trip which is sad, but enabled me to see how much detail I could really get out of this lens. Which brings me to my next tip:

3. When In Doubt Use 70mm at f/5.6

I should have learned this earlier by paying more attention to the reviews on this lens, but when its feasible 70mm stopped down a bit is golden. I know that a measly effective focal length of 140mm is hard to work with when trying to capture distant subjects, but the details you can here are incredible. So if you can.. use this VERY sweet spot!!!

Layers, 70mm, f/5.6, 1/640, iso 400
Something to consider is that the shot above was taken handheld at an arms length away because I had to spread the wings out AND take the picture at the same time. In addition it was taken outside and in the wind so I had to really bump up the shutter speed to freeze the motion. Imagine how good this lens would perform at 70mm in a controlled environment, like say in a studio where your subject is still, well lit, and the camera mounted onto a tripod with a remote trigger?! If I am getting these kind of results from a $150 zoom I can only imagine how Olympus' $900 M. Zuiko Digital 75mm f/1.8 "the holy grail" portrait lens performs!! Wowza!  

Original edited version of "Layers"

Unedited RAW, 100% crop
Finally, I want to show an image that was taken in not so optimal conditions so that you can gauge your expectations. The following was taken during a rainstorm in which an Osprey was using the Viking I as a hang out to ride the storm out.. I saw him from the ship's bridge, so naturally I found some cover (as the 40-150 zoom is not weather sealed) and tried to photograph him in conditions that were out of this lens' comfort zone. On a side note, my body and lens got rained on because I was not completely sheltered, but it was only a small amount and everything turned out ok... I would be scared to use this lens out in the open on a rainy day, DON'T DO IT!

Caught in the rain (original RAW), 100mm, f/5.6, 1/250, iso 2000 
Admittedly this image is pretty sad.. but from the viewpoint of "all I need is a picture to help me identify this bird" it was OK and with a little Lightroom magic you could make out that it was an osprey.. a very wet, very sad osprey, but one nonetheless! If my subject had been warbler or sparrow sized I doubt identification with this lens would have been possible. Even a good sized gull may have been difficult.

Edited RAW, 100% crop
I thought this lens deserved a little attention and wanted to share my experience because I have been truly surprised by it's performance as a tool for photographing birds. It really shines stopped down at 70mm, but absolutely useful even wide open at its long end. If you are a field biologist who has to identify birds and work in mostly daylight then this lens is a steal for $150. I suppose my final tip would be to mind your lighting, make the effort to practice and experiment with your equipment, and be sure to have fun while doing it :)

- Sam D.


Additional Sample Images


© 2012. Design by Main-Blogger - Blogger Template and Blogging Stuff